
What is Alexa skill?
Nowadays it is almost not possible to surprise someone with voice assistants. Google, Amazon, Apple, Microsoft they all have their own versions of such called voice interfaces. Physically it can be almost any device with processor and microphone so we can use our voice to tell commands to the device. So basically all we need is to ask the voice assistant on this device to do some things. From the developers perception it is interesting way to make calls to your API, because the main thing that voice interface does is translation sounds into words and later on those words will be formatted to specific request that will be sent to our application.
In the context of Amazon we have Alexa as a voice assistant, Alexa-enabled devices (in my case it is echo dot device) and amazon web services (aws) or any other rest api as a backend. The amount of Alexa skills is growing really fast and nowadays you can find a lot of useful things on the official skills page. But nevertheless there are a lot of skills it is really fun and sometimes profitable to create your own Alexa skill. And this is something we are going to do in this article.
Where to start
Websites we will use
To start building alexa skill we will use such components as:
- aws console
- aws developer console
- alexa page
- alexa enabled device
AWS console is a standard amazon web services console. Within all available services we will user
only lambda funcion, cloudwatch, s3 buckets and it suppose to be costless implementation.
AWS developer console you can reach by using this link. This is one of the main places which will be used during implementation and testing phases.
Alexa page is this page which is the place where you can enable new alexa skills for your device or choose different settings for alexa.
Alexa enabled device will be needed to test audio output because simulator provided by AWS developer console
does not allow us to hear audio stream.
In this article we are not going to discuss how to sign up for aws, as a precondition everything has to be arranged beforehand.
Repositories that might be helpful
The code of this project is in this repo. As a good source of example code we can use aws repo. In this repo we can find several useful projects written by amazon team. The next important thing is documentation of alexa sdk, unfortunately it is not really easy to navigate there, but it is a good source of knowledge.
How to create custom alexa skill
First of all we need to go to amazon developer console and create our skill:
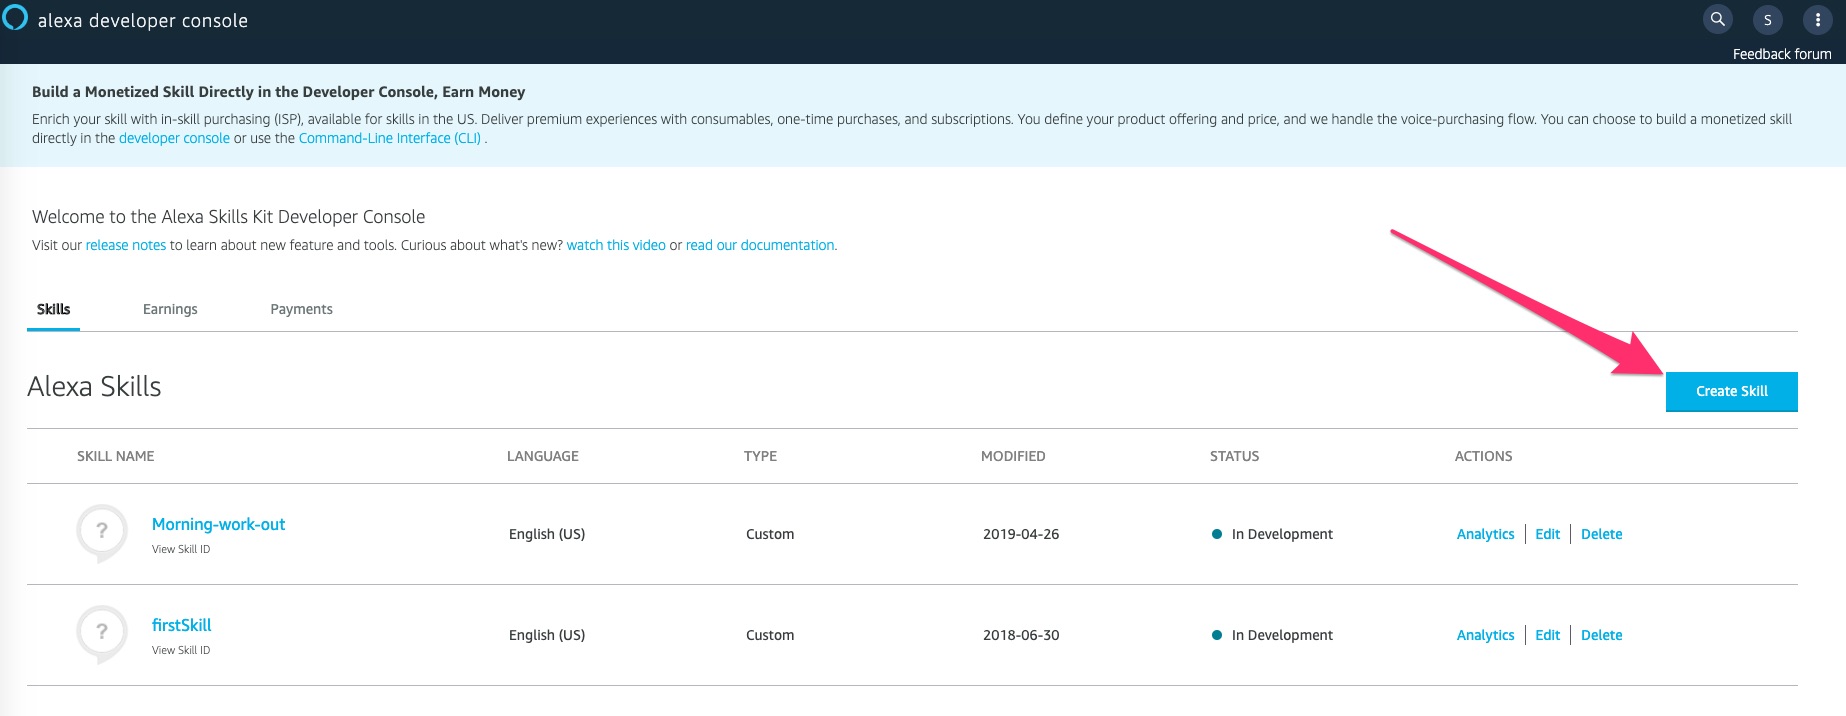 .
On the next screens we have to choose the name of the skill, its type (in our case custom), the
template
.
On the next screens we have to choose the name of the skill, its type (in our case custom), the
template start from the scratch - finally you will see the console which looks something like this
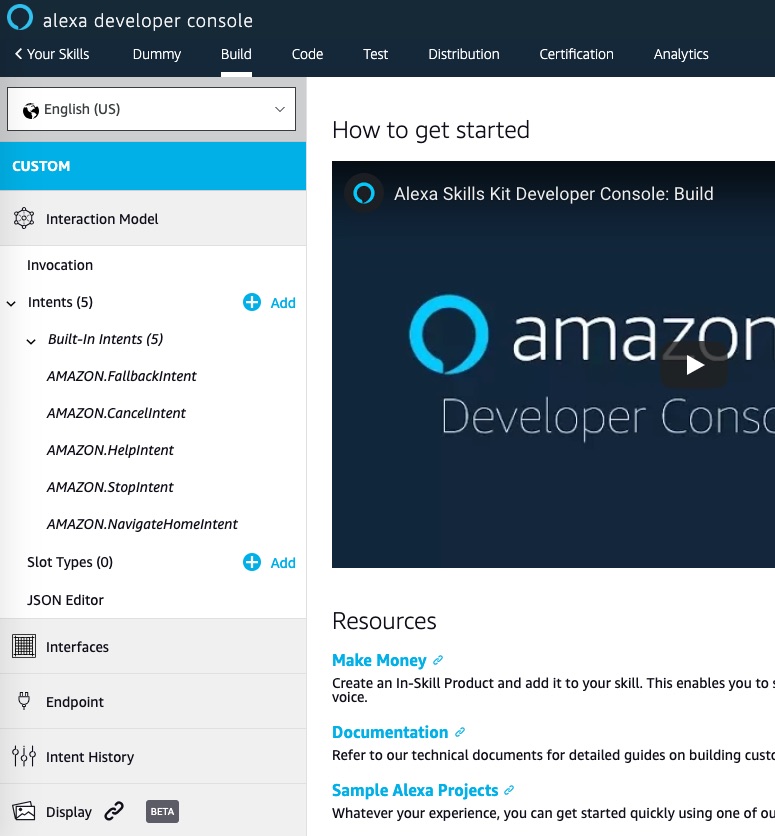 .
On this page we will need three crucial parts:
.
On this page we will need three crucial parts:
- interaction model
- interfaces
- endpoint
Interfaces
In interfaces there is the list of interfaces that can be enabled for our skill. For the skill
that we are going to build we need to enable Audio Player - it allows us to stream audio files
in our skill.
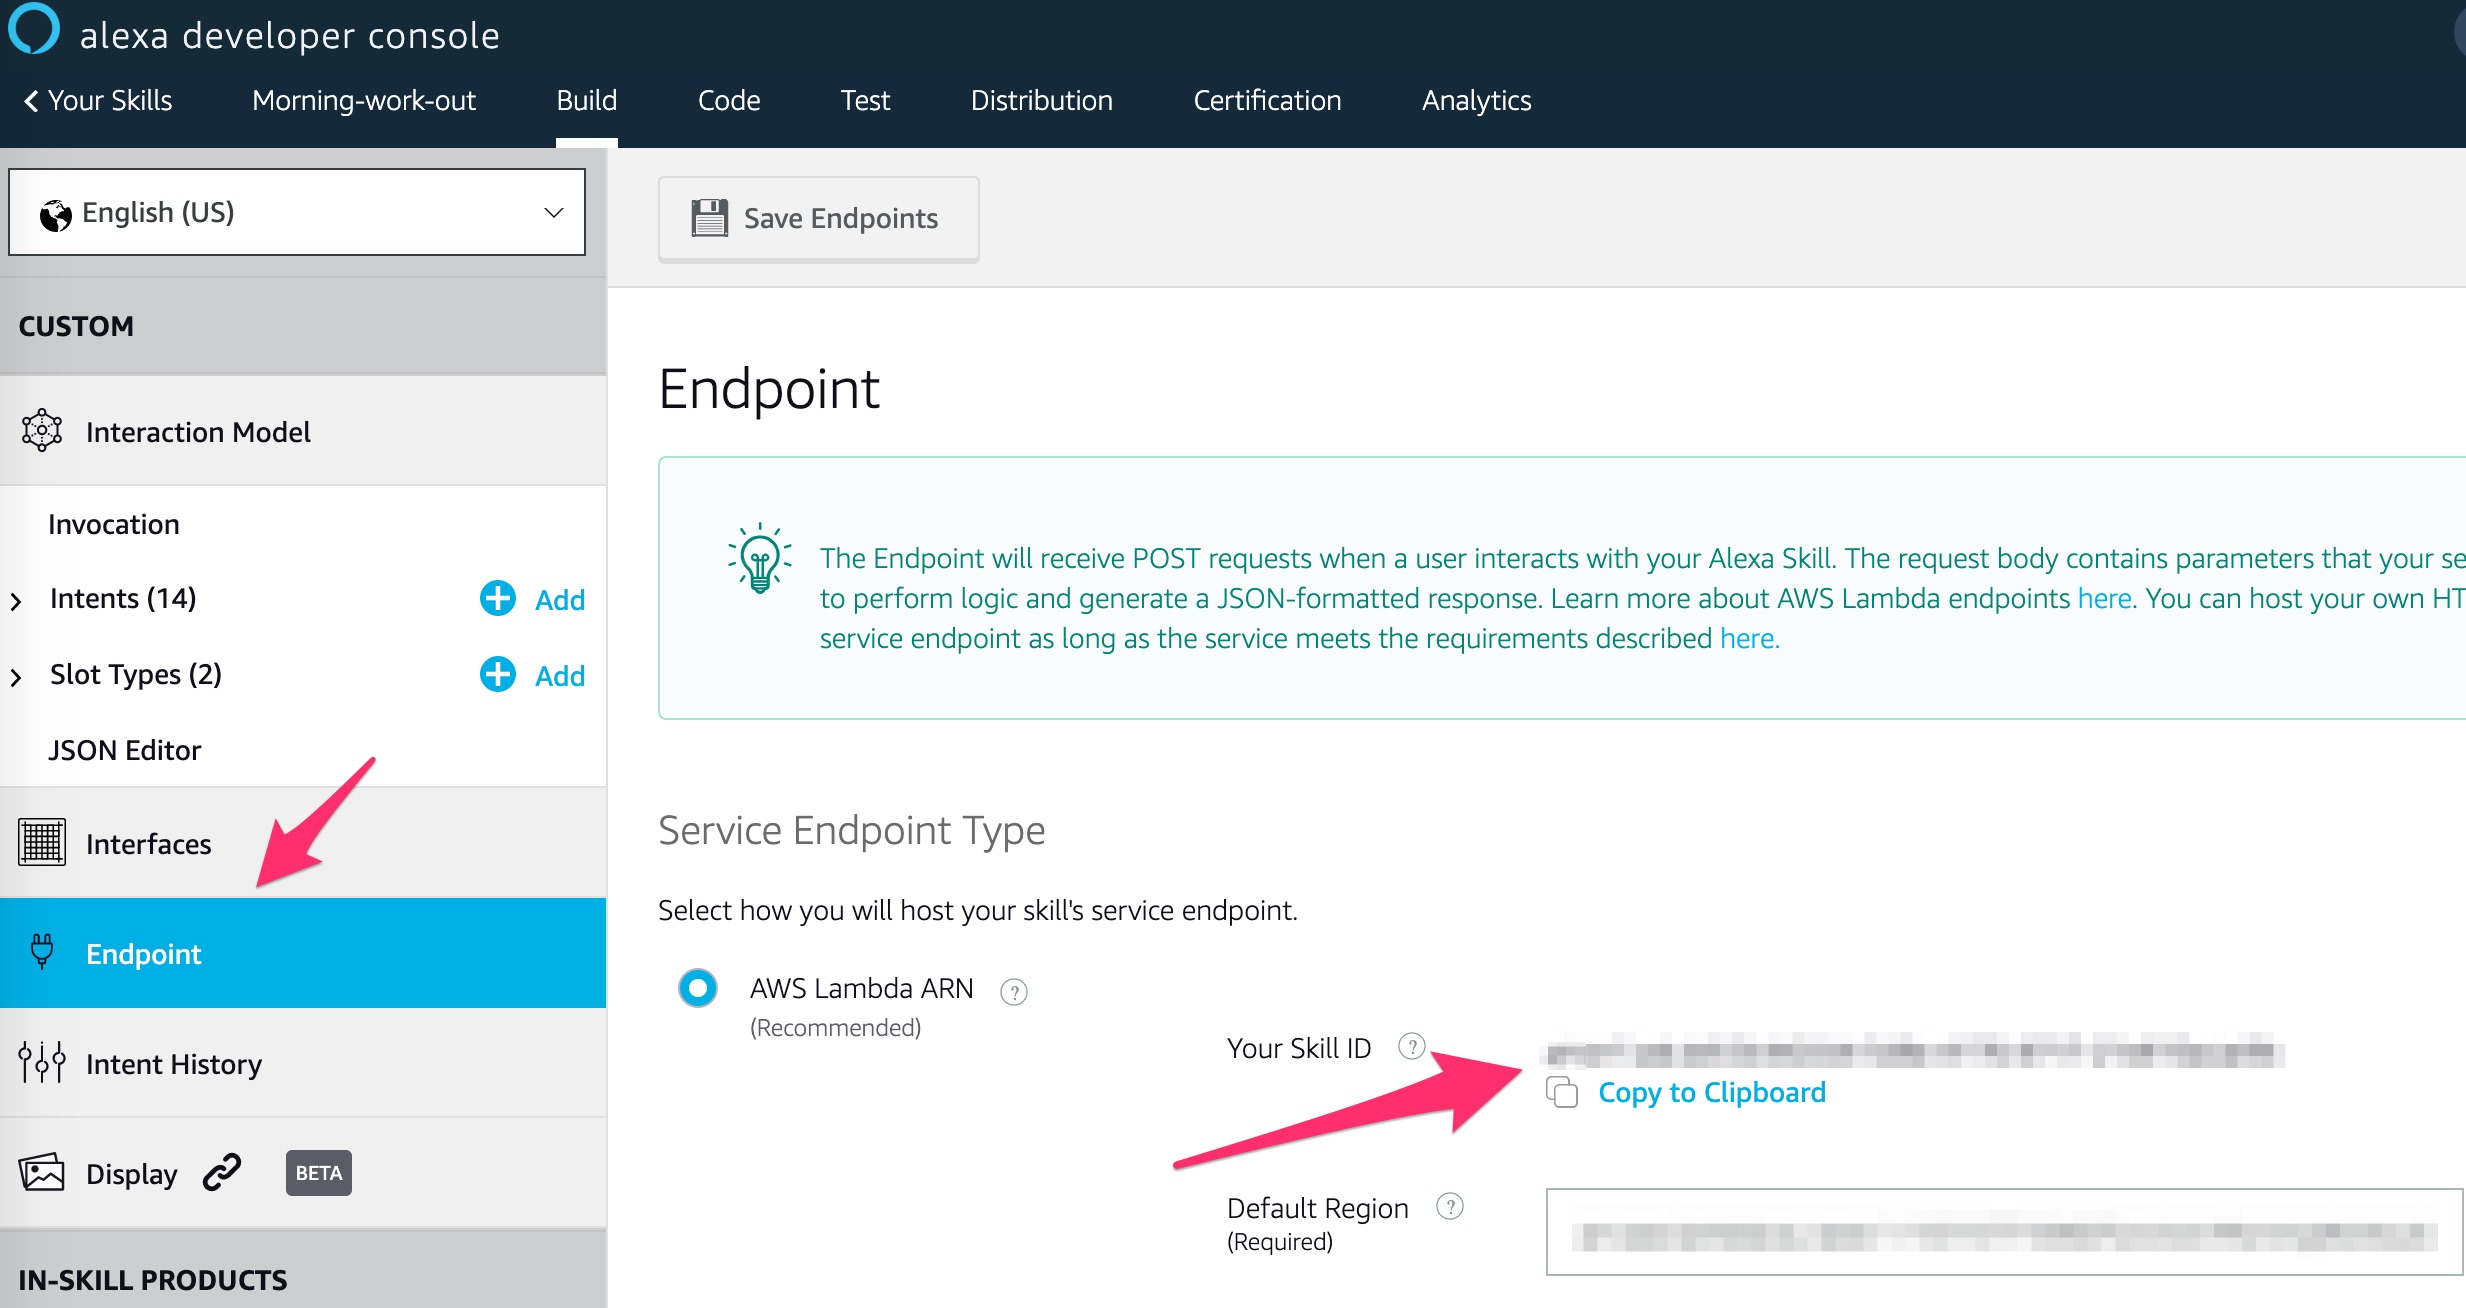
Endpoint
Endpoint is a page on which we must specify ARN of lambda function that will be invoked by
our skill and here we can find the skill id that we will use later on to connect our lambda to
alexa interface.

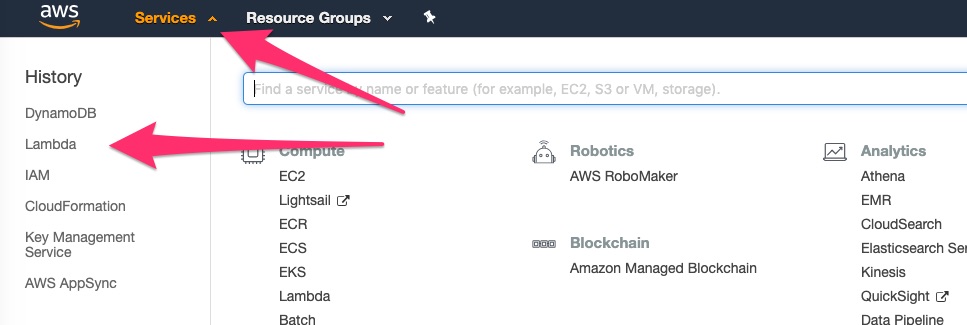
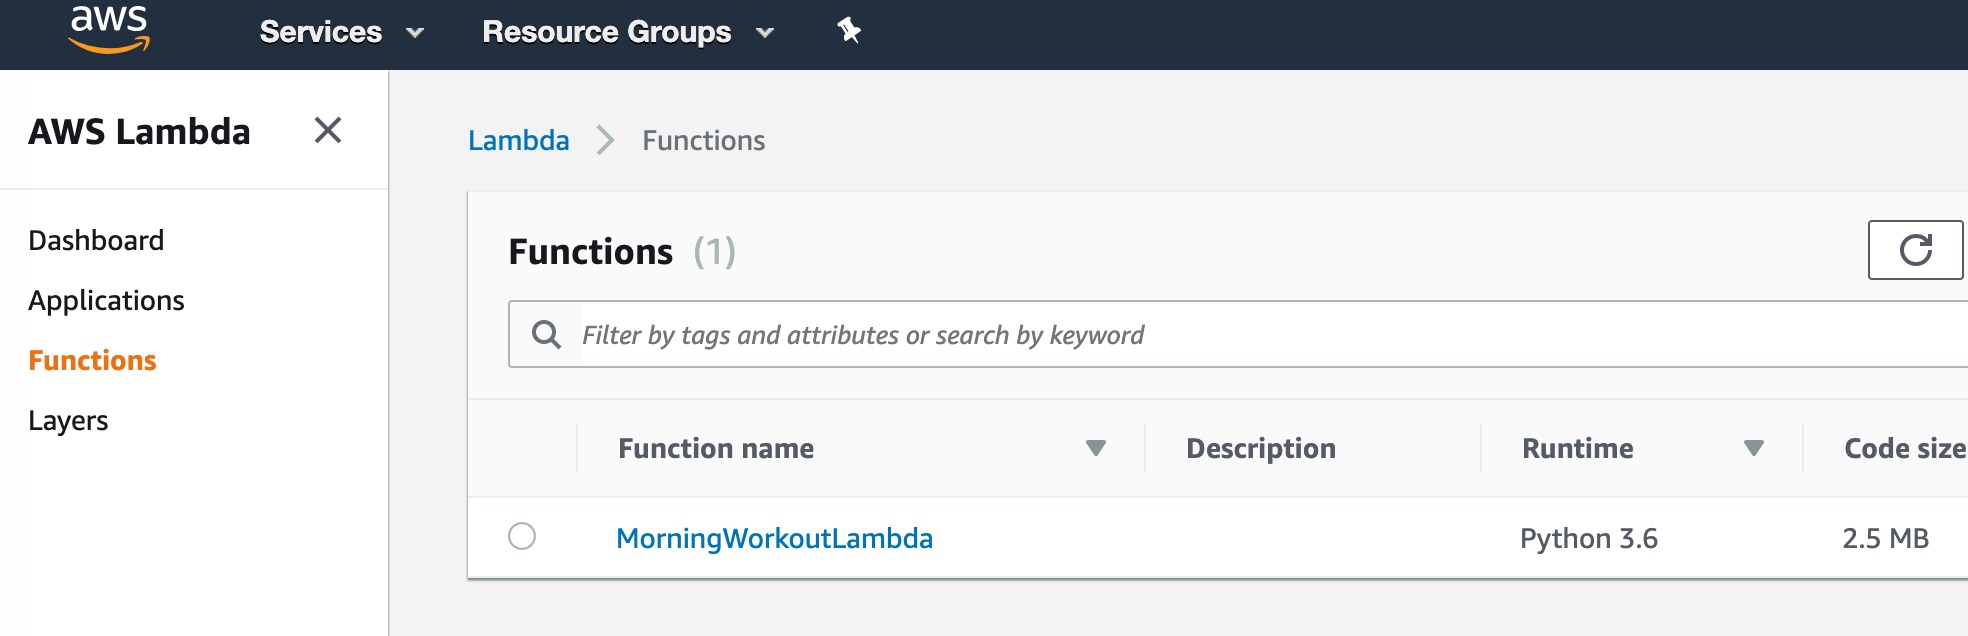
ARN stands for amazon resource name and it can be found in amazon webservices console: choose
Services on the top then Lambda like on the screen or search for Lambda using search bar:
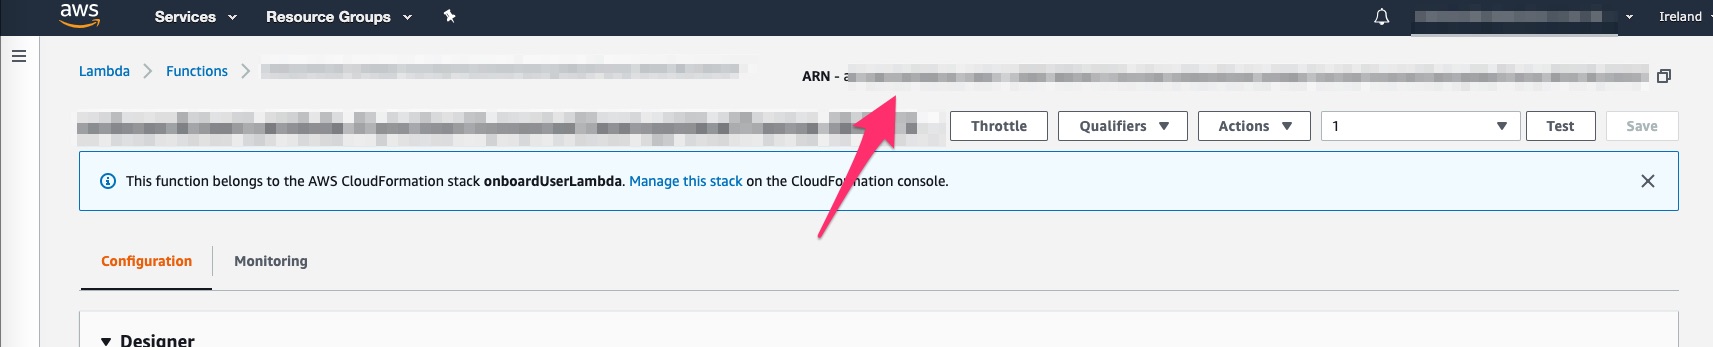
Then choose your function within the list of functions. If everything was done correctly you have
to see something like this:
Interaction model
This is one of the most used page as for me. Using it we can set the invocation name of our skill
and specify different intentions to which our skill can reply. By default we should see the list
of predefined intentions like this:
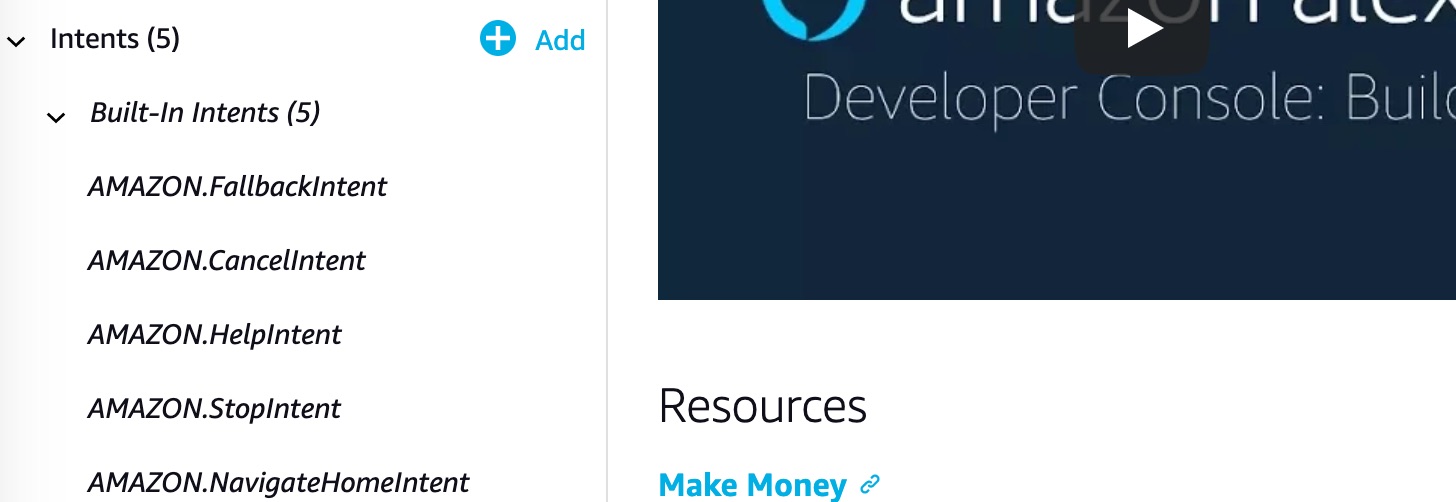
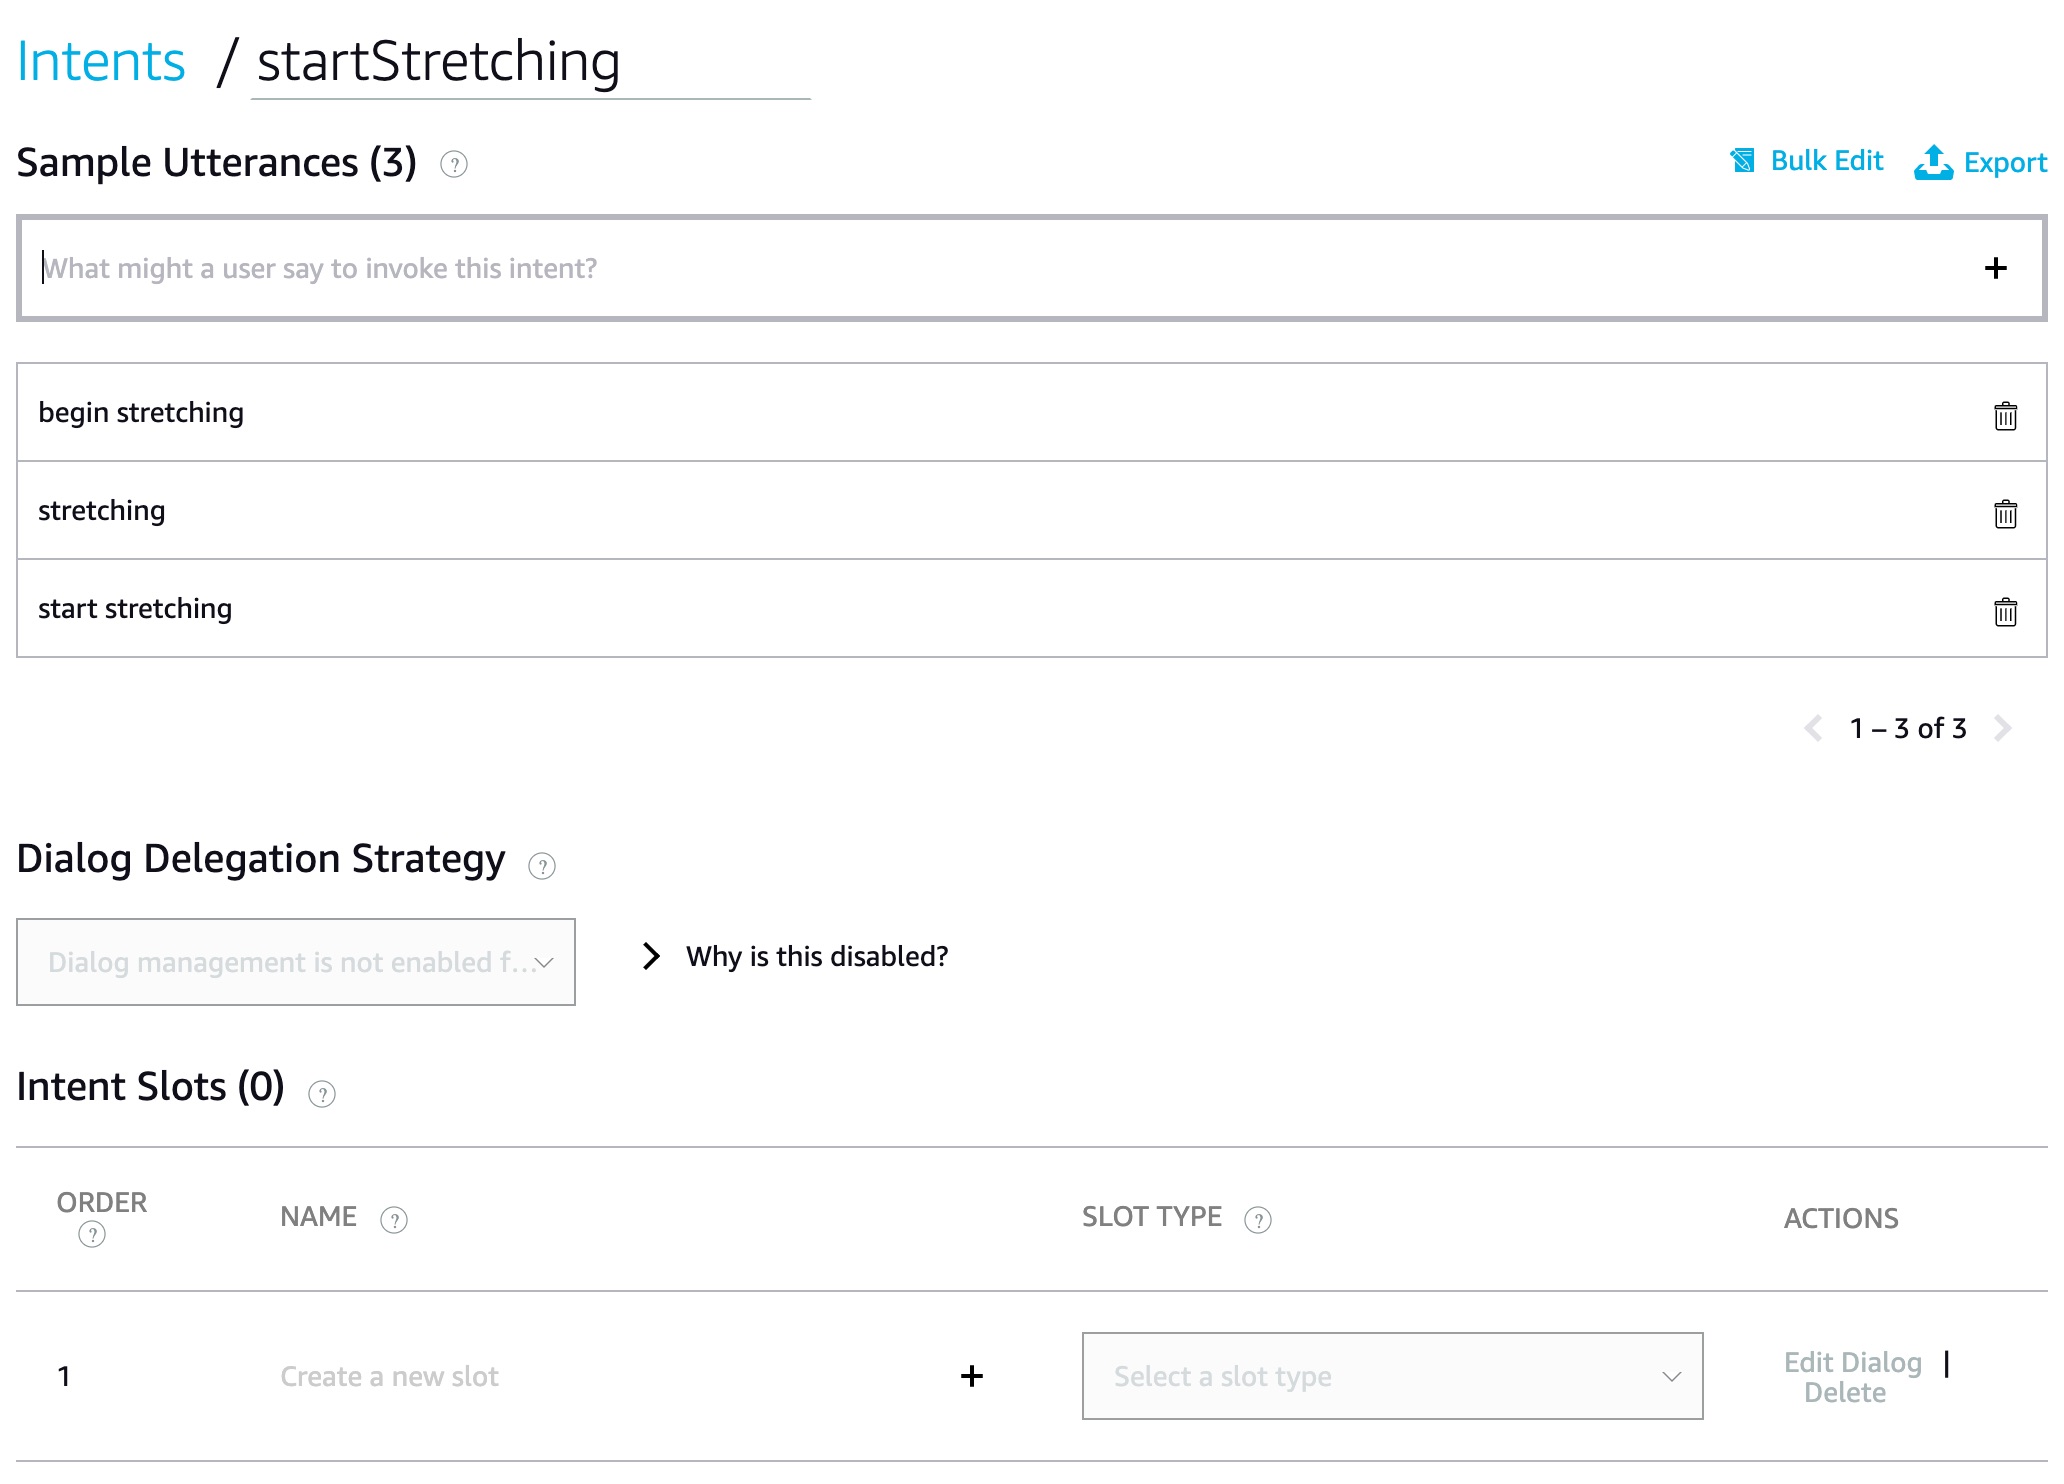
Using this tab we can create our custom intentions. This process is really simple and all we need to specify:
- intent's name
- utterances that will be bound with this intent
- slot which is the information inside utterance which might be used in our skill
Also on the interaction model tab there is JSON Editor which represents the configuration of
the skill's interaction model in json format - it an easiest way (as for me) to edit intents. But
in this article we will use web console more.
What our tutorial skill will be about?
The skill that we are about to build is a mourning exercises coach. It suppose to be able to assist you in: stretching, active physical exercises, plank (this last item won't be implemented due to reasons explained below).
Overall behaviour
Our skill will ask user what is he/she going to do. After user's response corresponding activity will start.
Stretching
Skill will start 30 seconds intervals and after each interval it will wait for 16 seconds for the new input from user if there will be no input - the skill will be shutdown.
Exercises
This activity will start one of the several audio tracks for morning exercises. That's why we will
need to enable Audio Player on the interfaces tab in developer console.
Plank
The initial idea was to start timer based on the user input and when times runs out - turn on the
beeping sound, but apparently there is no proper way to set an alarm withing custom skill (at
least for now). Related intents will be still there in the codebase.
Let's create interaction model of the alexa skill
There are two ways to do it:
- via web console: in this case we need to open
interaction modeltab and click on+ Addbutton. Then we need to provideintentNameand several utterances that will be associated with this intent. Also if we need to get some specific input that has to be recognized we may useslots. The slot can be represented with the name and associated type for exampleAMAZON.NUMBER. - via json file which is probably easier for us as developers
{
    "interactionModel": {
        "languageModel": {
            "invocationName": "morning workout",
            "intents": [
                {
                    "name": "AMAZON.FallbackIntent",
                    "samples": []
                },
                {
                    "name": "AMAZON.CancelIntent",
                    "samples": []
                },
                {
                    "name": "AMAZON.HelpIntent",
                    "samples": []
                },
                {
                    "name": "AMAZON.StopIntent",
                    "samples": []
                },
                {
                    "name": "AMAZON.NavigateHomeIntent",
                    "samples": []
                },
                {
                    "name": "startStretching",
                    "slots": [],
                    "samples": [
                        "begin stretching",
                        "stretching",
                        "start stretching"
                    ]
                },
                {
                    "name": "stopStretching",
                    "slots": [],
                    "samples": [
                        "stop stretching"
                    ]
                },
                {
                    "name": "ready",
                    "slots": [],
                    "samples": [
                        "ready"
                    ]
                },
                {
                    "name": "startPlank",
                    "slots": [],
                    "samples": [
                        "begin plank",
                        "plank",
                        "start plank"
                    ]
                },
                {
                    "name": "plankTime",
                    "slots": [
                        {
                            "name": "minutesValue",
                            "type": "AMAZON.NUMBER"
                        },
                        {
                            "name": "secondsValue",
                            "type": "AMAZON.NUMBER"
                        }
                    ],
                    "samples": [
                        "{minutesValue} minute",
                        "{minutesValue} minutes",
                        "{minutesValue} minutes and {secondsValue} seconds",
                        "{minutesValue} minutes {secondsValue} seconds"
                    ]
                },
                {
                    "name": "startExercises",
                    "slots": [],
                    "samples": [
                        "exercises",
                        "begin exercises",
                        "start exercises"
                    ]
                },
                {
                    "name": "exercisesVersion",
                    "slots": [
                        {
                            "name": "versionNumber",
                            "type": "AMAZON.Ordinal"
                        }
                    ],
                    "samples": [
                        "{versionNumber}"
                    ]
                },
                {
                    "name": "AMAZON.PauseIntent",
                    "samples": []
                },
                {
                    "name": "AMAZON.ResumeIntent",
                    "samples": []
                }
            ],
            "types": []
        }
    }
}
Let's take a look at this json. The first thing we have to notice is the invocationName field
which expects the word to be used to start our skill.
Then we have an array of intents. Each intent contains:
namethe name based on which we can differentiate different custom intentssamples- it is an array of utterances - array of phrases we can use to interact with our skillslots- the array of variables that can be used in the skill. This variables are parts of utterances for example:
{minutesValue} minutes and {secondsValue} seconds
In this case voice interface will listen to the user's input and translates words into
minutesValue and secondsValue. As far as type of these variables is AMAZON.NUMBER in the
implementation we can receive and use number values of this variables. For example: word one
will be converted to integer 1.
{: .notice--warning}
NOTE: we have to remember that Alexa will use exactly the sentence that we specified in
samples. This mean we have to use utterances with plural minutes and seconds which is a
natural way apart with single minute and second.
How to create backend for alexa skill
As a backend for the alexa skill variety of tools can be used:
awslambda function- other services like lambda functions
- basically any kind of server that is reachable via internet
Alexa works with rest endpoints, sends requests and expects specific json back. We can find
documentation regarding json structure here
In this article we will create aws lambda function as a backend
Ways to create aws lambda function
There are a few ways how we can do this:
- manually - we need access to
AWS console. Lambda can be created using web-interface, there is nothing special in this way but disadvantage of this approach is that whenever we need to do the same thing again we will do it manually once again (it's no so hard but still we have to remember some details and do routine operations) - automatically - using
aws cliorsamwhich is the wrapper on top ofaws cli. This approach is much reliable and can be integrated in ci/cd flow. We are going to you use this approach. You can see the file here
Logically the script can be splitted in three steps:
- dependencies preparation
- lambda deployment
- files uploading
Dependencies preparation
This is the part that describes the step:
pip install awscli aws-sam-cli

original_sam_yaml=morning-workout.yaml
packaged_sam_yaml=packaged-morning-workout.yaml

mkdir src_temp
cp -r src/* src_temp
cd src && ls && pip3 install -r requirements.txt --target . && cd ..
Here we make sure that awscli and aws-sam-cli are installed on our machine.
{: .notice--warning} NOTE: There is no check of the configured aws credentials in the script, but make sure that you configured them beforehand.
Then there are two variables that hold names of files: original_sam_yaml will be used to point
sam to the template, packaged_sam_yaml will be used to specify to which file sam has to put
updated template (on package phase sam modifies original template with actual amazon resource
names later on this template will be used by deploy command).
When we will execute package command everything in the folder that we specified will be
deployed to s3 bucket in aws. Later on those files will be used by lambda and this is the only
way for now to provide custom dependencies for our lambda. In our case we are going to build
alexa skill for this we will use special aws sdk. Unfortunately this sdk is not a part of the
default lambda environment which means we have to provide sdk as a custom dependency.
In order to do this we install all the requirements from the requirements.txt file in src folder.
Before hand I am creating the temp folder which is the exact copy of src - the idea is to install
all dependencies in one src folder, then package this folder and remove it from local disk. In
this case we won't pollute our local dev environment with those libraries from the dependencies.
Lambda deployment
The next part of the script is about lambda deployment:
AWS_DEFAULT_REGION=us-west-1 sam validate -t $original_sam_yaml --profile "personal"
aws s3 mb s3://bucket_name --profile "personal"
sam package --template-file $original_sam_yaml --s3-bucket "bucket_name" --output-template-file $packaged_sam_yaml --profile "personal"
sam deploy --template-file $packaged_sam_yaml --stack-name "morning-workout" --region "eu-west-1" --profile "personal" --capabilities CAPABILITY_IAM
Here we can see that mostly we are using sam to validate template (if it is not valid we will
get related error with the line in which validation failed), package (uploads files to s3
bucket to be used later by deploy command), deploy (creates aws resources based on the uploaded
template). Also there is aws s3 mb command which creates s3 bucket, the thing is that package
command relies on an existing bucket, but as far as previously there was no bucket we needed - we
have to create it.
You might noticed the --profile flag which indicates the profile in the aws cli configuration
that is used to deploy resources. I recommend you to use named profile (not default one) in this
case you will be sure that you won't deploy resources to unknown account (if you have profile for
work and personal profile).
Files uploading
This step might be not necessary for other skills, but in our case we want to upload mp3 files to s3 bucket in order to allow our skill play these files.
aws s3 mb s3://mp3_bucket_name --profile "personal"

files_description=`aws s3 ls s3://mp3_bucket_name --profile personal`

files_to_upload=`cd resources/ && ls`

s3_bucket_needs_update=false

for file_to_upload in $files_to_upload
do
  if [[ $files_description != *$file_to_upload* ]]; then
    s3_bucket_needs_update=true
  fi
done

if [[ "$s3_bucket_needs_update" == true ]]; then
  echo 'Resource files will be uploaded'
  aws s3 cp resources s3://moring-workout-songs --recursive --profile "personal" --acl public-read
else
  echo 'All files are up to date'
fi
The idea here is to upload files to s3 bucket only if it is necessary and files are already there this part will just skip uploading operation.
The actual implementation of alexa skill
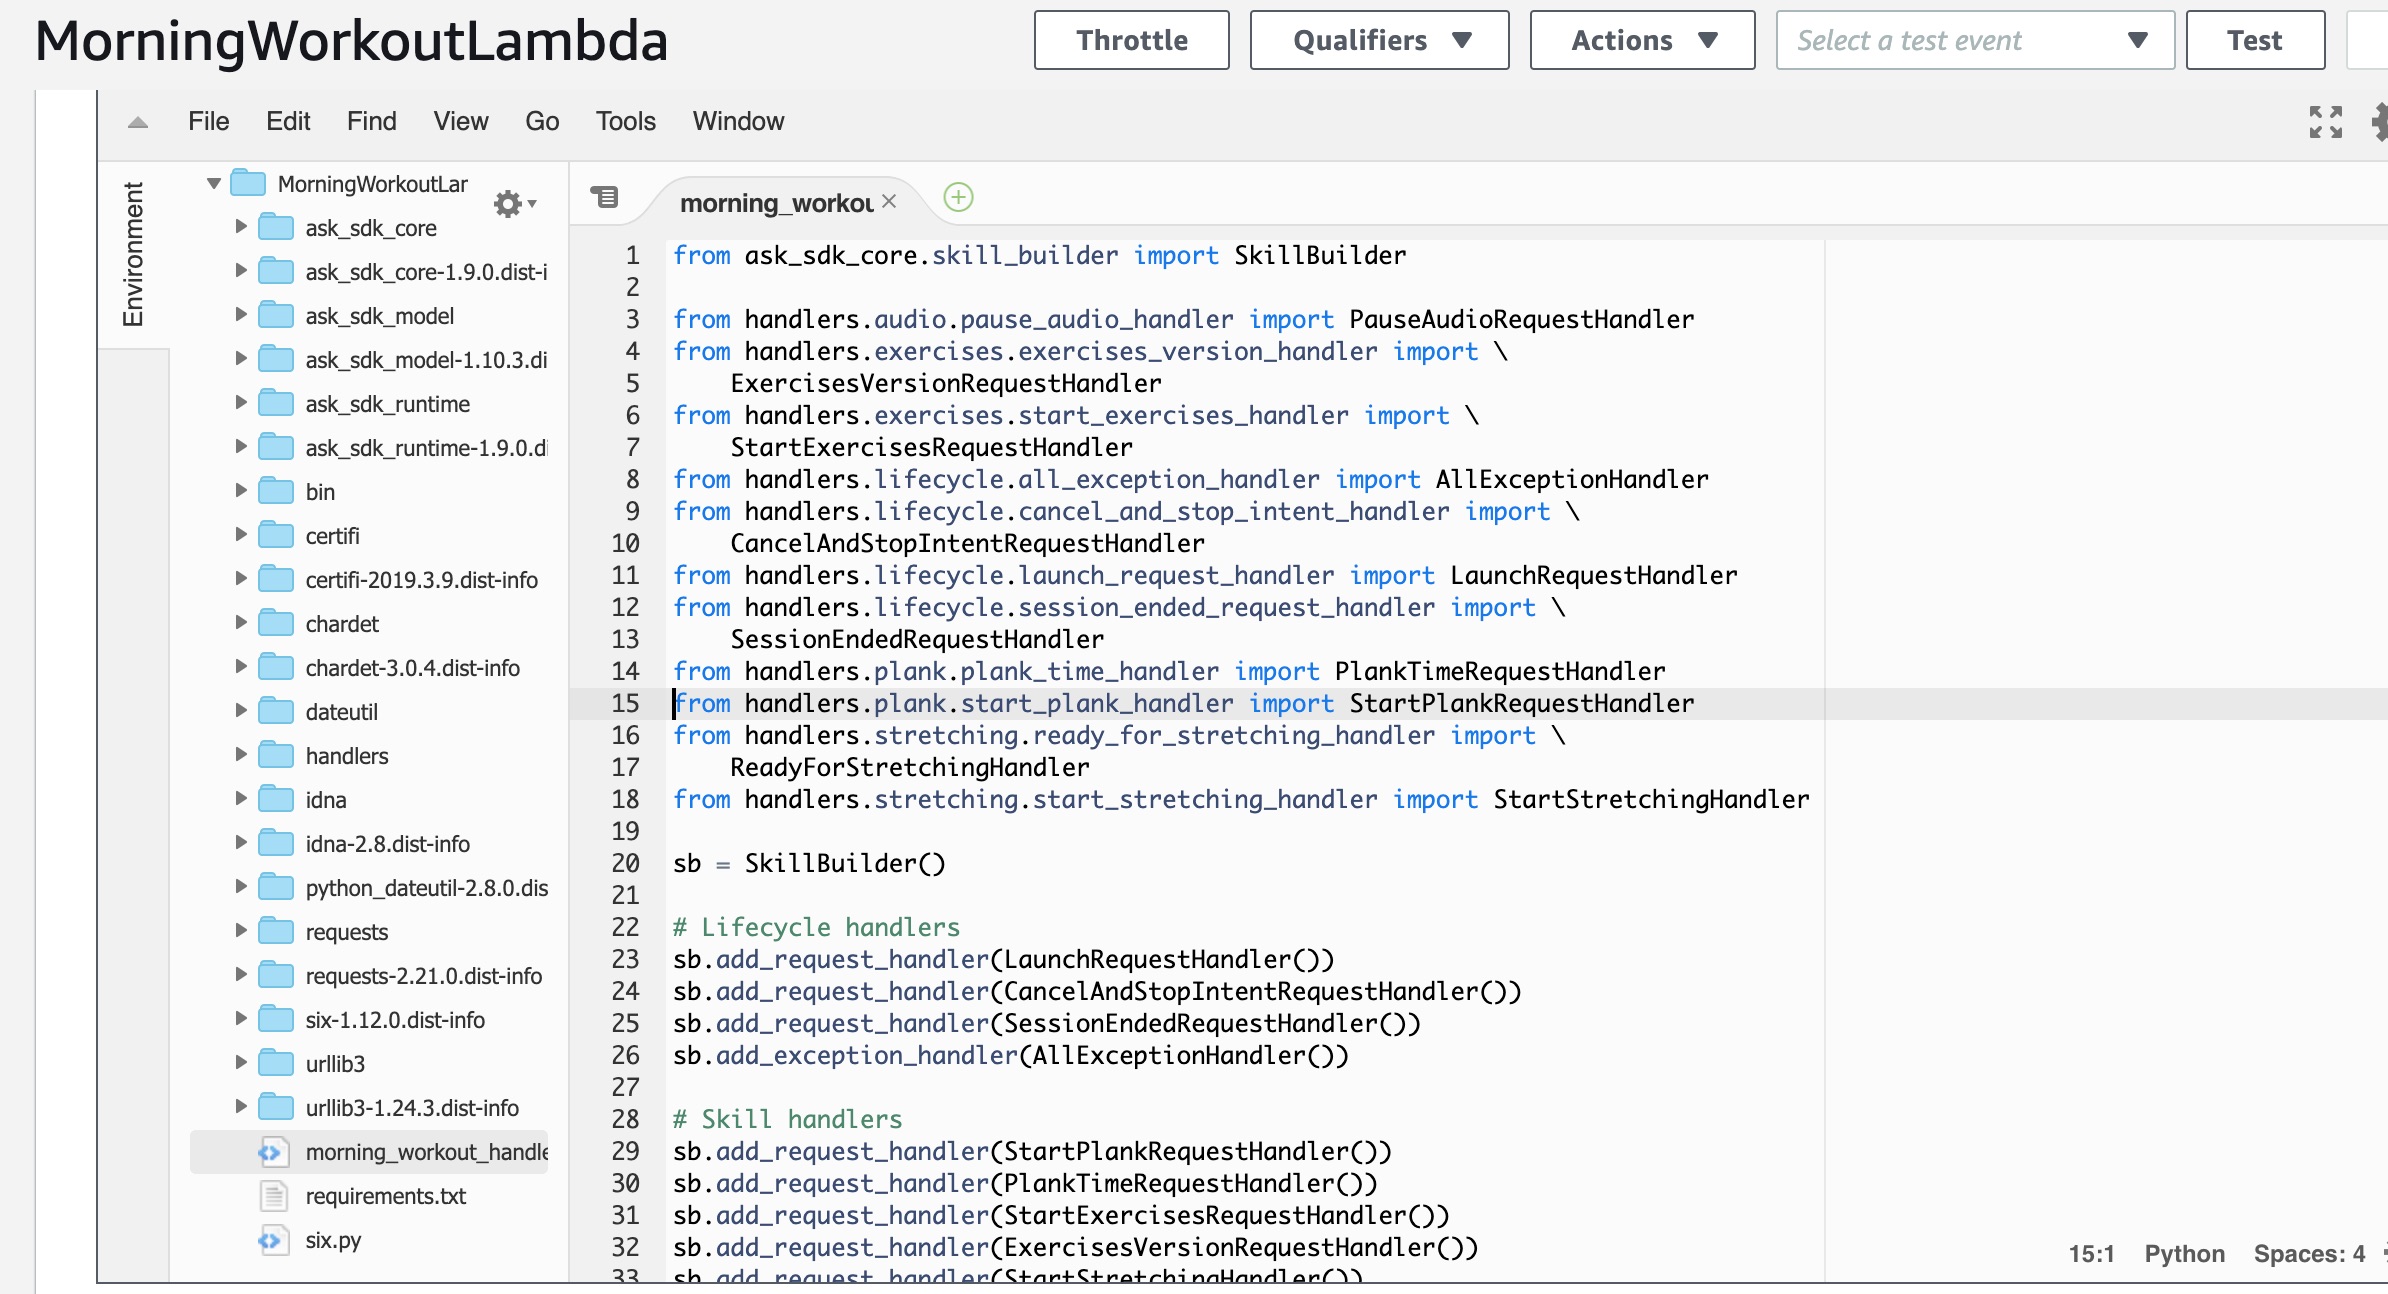
Now let's look into the code of our alexa skill.
It contains handler as an entrypoint for lambda and then we see a lot of add_request_handler
operations called on SkillBuilder. This class is provided by aws python sdk and helps us to
easily create implementation for the skill because it wraps our own code with all converters and
other things that are needed to comply with alexa api. So we don't have to think about the
proper json as a response, we also don't need to think about parsing of the request - most of the
things are already implemented in the sdk. But the disadvantage of this is that we need to
provide aws sdk as a dependency during the lambda deployment.
Once we use aws sdk the only thing we need is to implement the class - actual handler of the intent:
from ask_sdk_core.utils import is_intent_name
from ask_sdk_runtime.dispatch_components import AbstractRequestHandler


class StartStretchingHandler(AbstractRequestHandler):
    def can_handle(self, handler_input):
        # type: (HandlerInput) -> bool
        return is_intent_name("startStretching")(handler_input)

    def handle(self, handler_input):
        # type: (HandlerInput) -> Response
        speech = '<voice name="Matthew"> Ok, we will start stretching whenever you will say ' \
                 '<emphasis level="moderate">Ready</emphasis></voice>'
        handler_input.response_builder.speak(speech)\
            .ask('<voice name="Matthew"> Waiting until you are ready' \
                 '<emphasis level="moderate">Ready</emphasis></voice>')\
            .set_should_end_session(False)
        attr = handler_input.attributes_manager.session_attributes
        attr["state"] = "started_stretching"
        attr["counter"] = 0

        return handler_input.response_builder.response
can_handle method filters intents on which this handler capable to answer and as you can see it
is straight forward.
The rest of the implementation I believe is easy to understand.
CI/CD for serverless
As I mentioned previously we are using awscli and sam in order to be reused in ci/cd. Things
we need to do:
- create ci/cd pipeline file
- provide ci/cd tool with AWS_ACCESS_KEY_ID and AWS_SECRET_ACCESS_KEY as environment variables
- modify deploy script to use these env variables instead of profile (it means we need to delete
--profile personalpart) - run deploy.sh script to deploy lambda
But I decided not to make these steps as far as it is safer and simpler to use from the local machine.
Deployment process
To deploy lambda we need to run deploy.sh script. As a result we should see something like this
in aws web console:
Also we can check the content of the lambda - we have to check that our dependencies were packed
with all libraries.
Really important thing is that we have to add trigger to our lambda - it has to be Alexa skills kit, unfortunately it is not possible to do via cloudformation script for now.
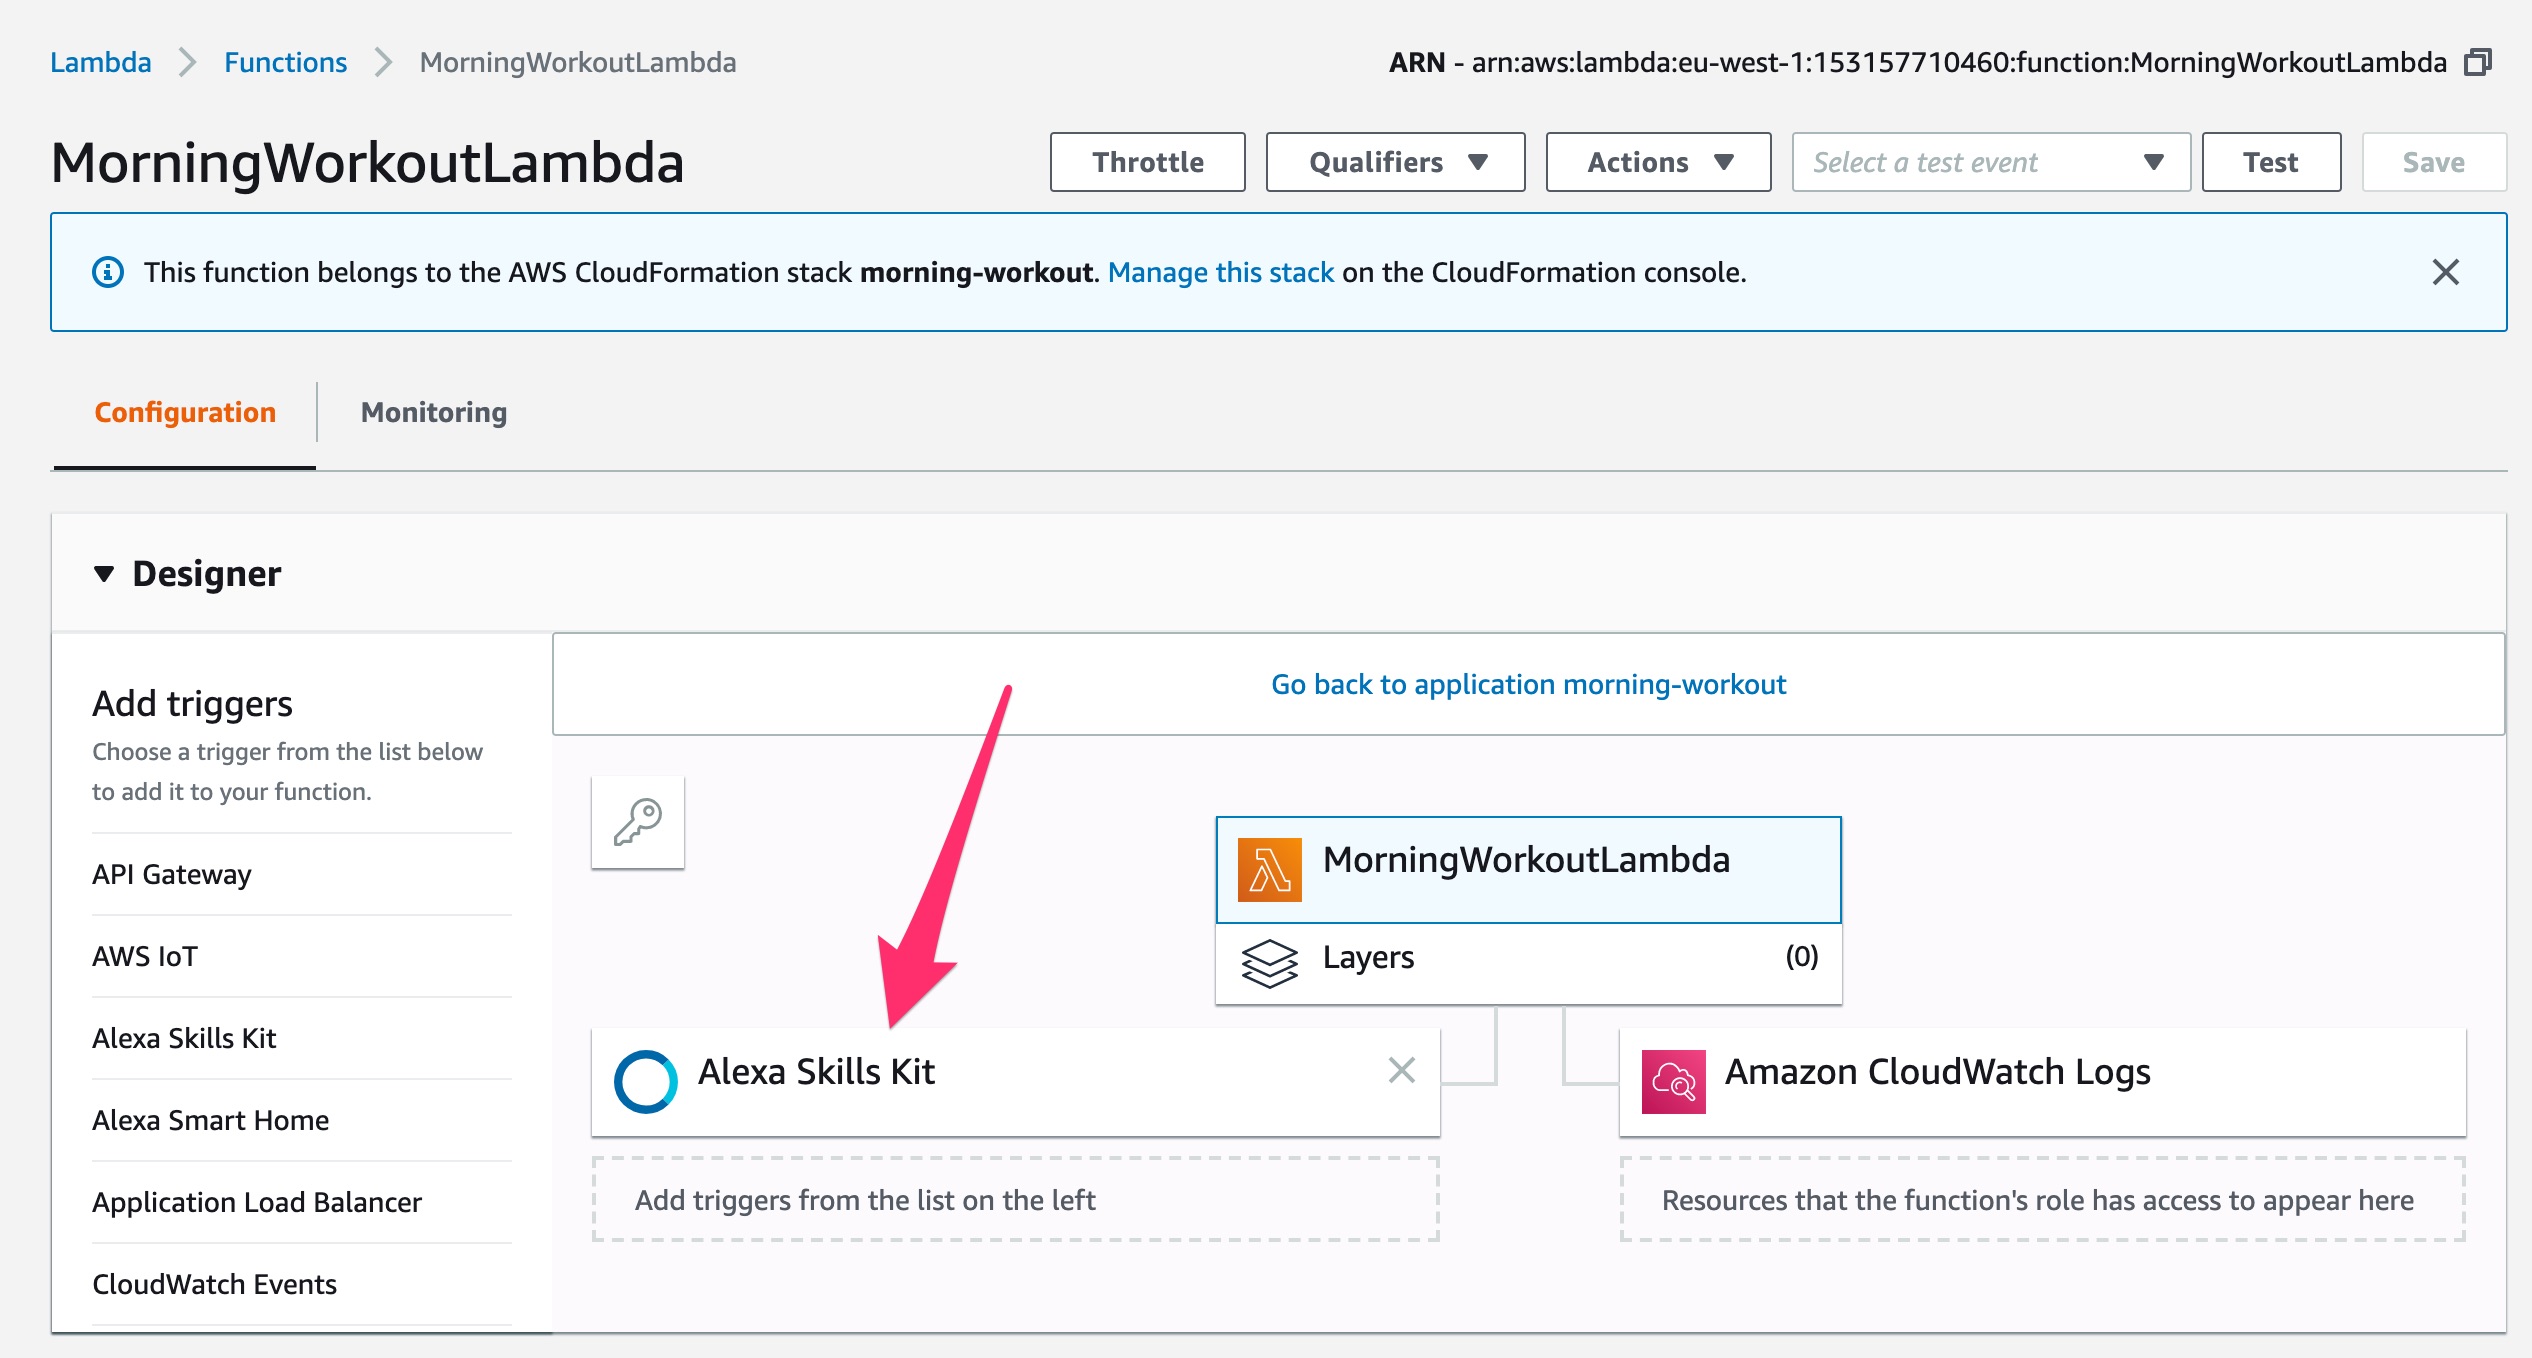
To be able to add this trigger we have to specify skill id at the bottom of the trigger page
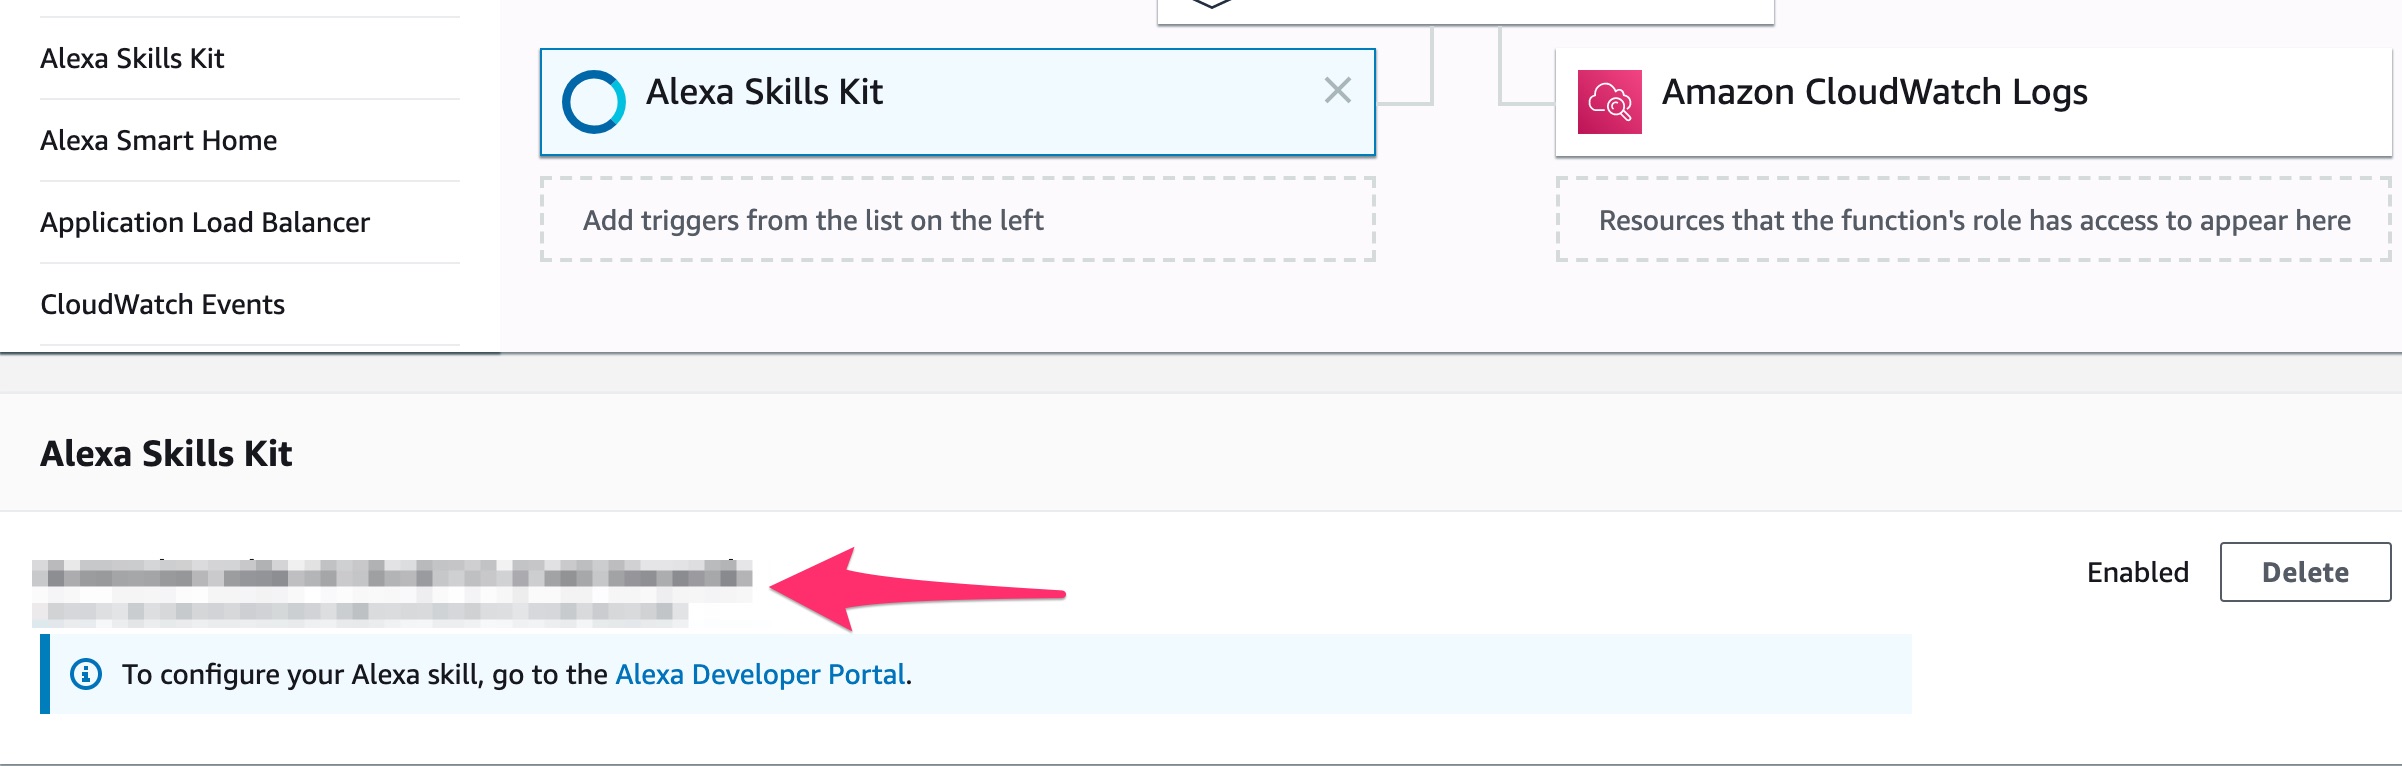 We can easily can find this id in amazon developer's console -> our skill -> endpoint.
When lambda is connected to the skill we can finally try to use via developer's console.
How to test alexa skill?
In order to test our skill we can use amazon developer's console, but first we need to build our skill to do this:
- save skill
- build model
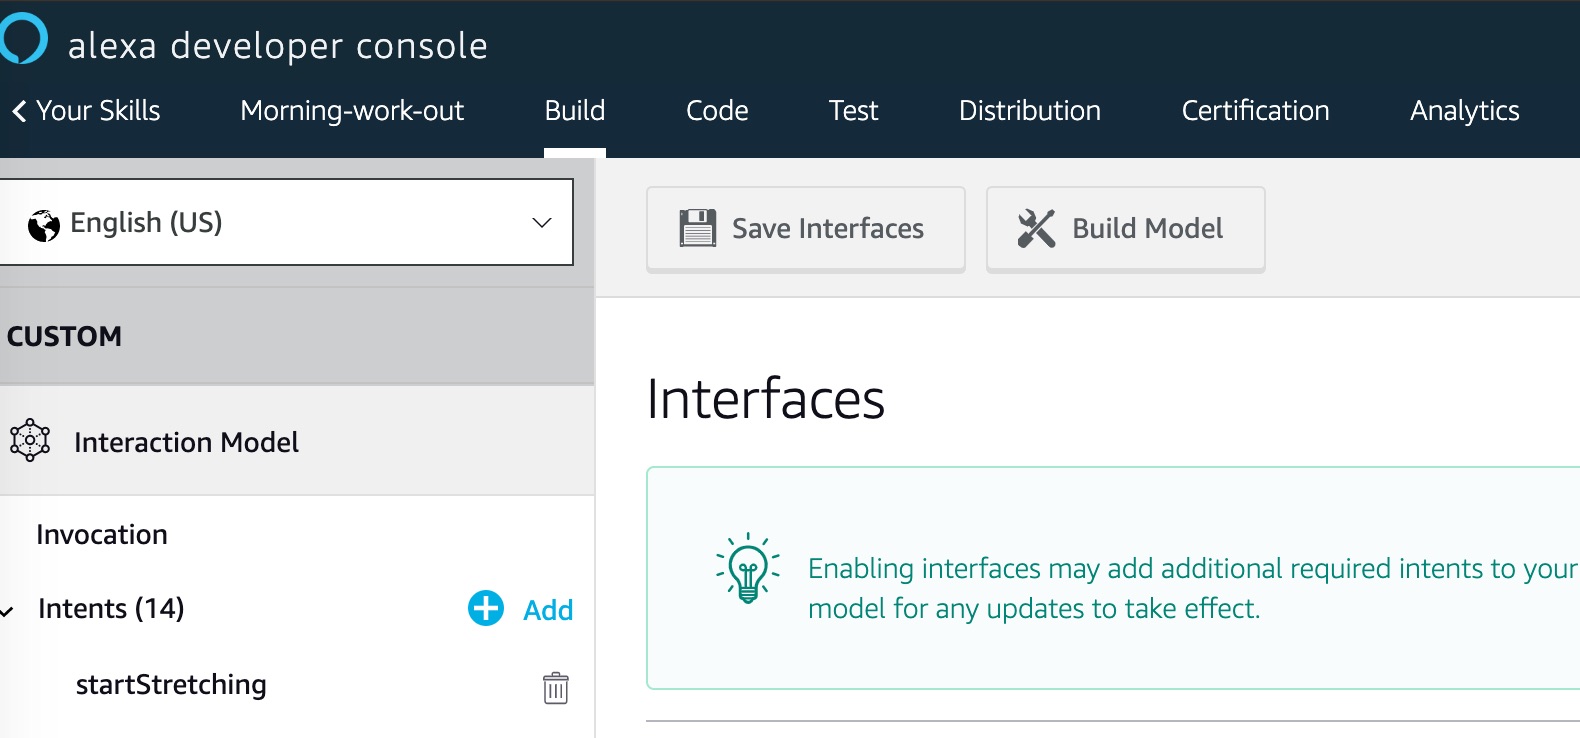
When skill is build we can finally test it:
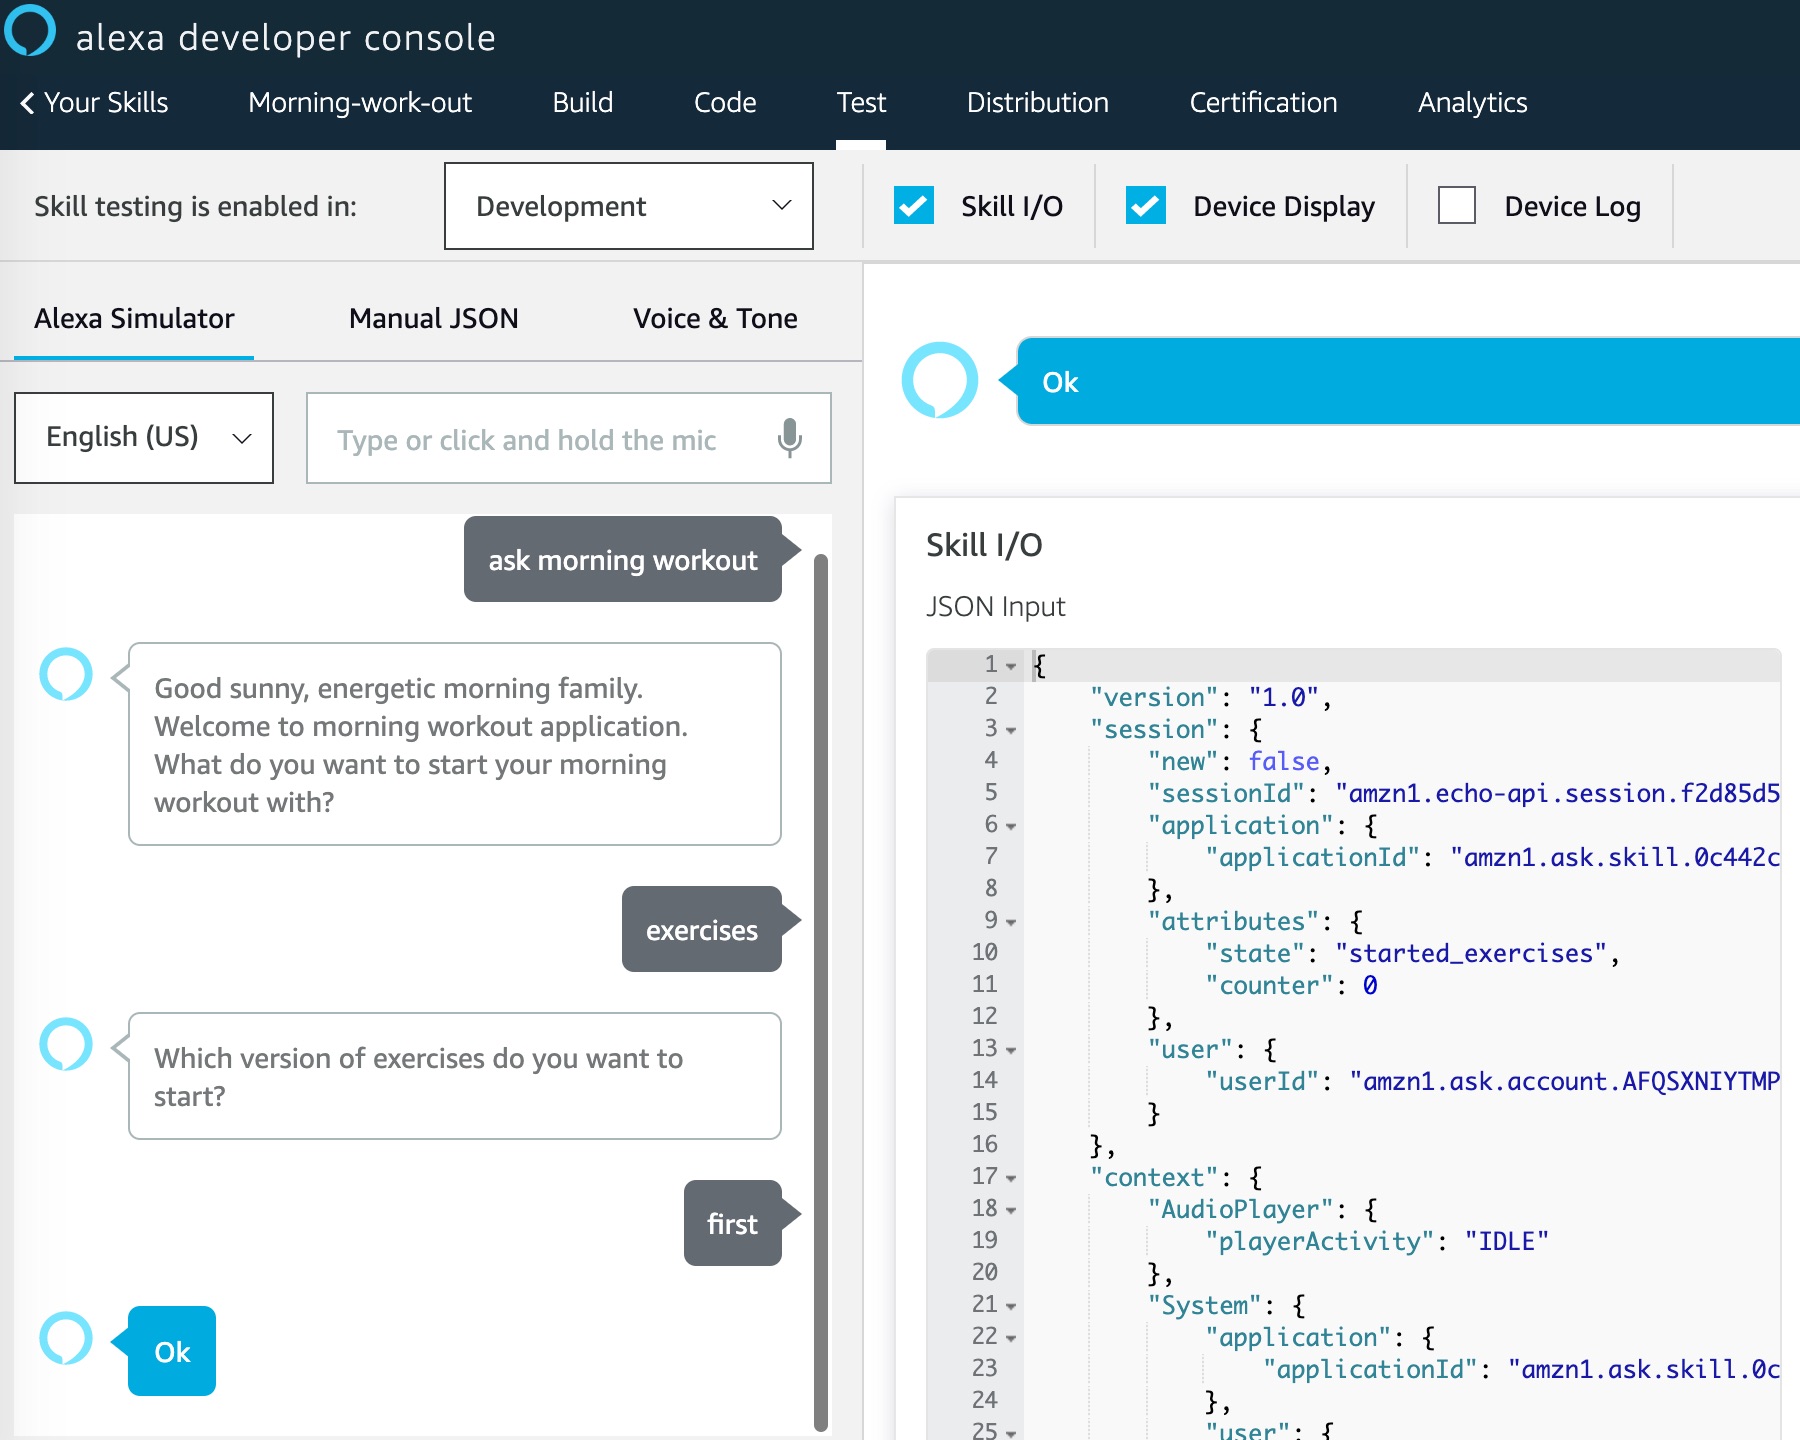
We can use text typed in corresponding field or use microphone. It is a really useful page as far as we can see input and output json objects and we can do bugfixing based on the information we get here. Also it is quite useful to make error handler that will pronounce exception, but this approach has to be used only during development in order not to expose technical things to the user.
How to enable skill for our own alexa device?
The last, but not the least part is enabling our custom skill in the alexa console. I am using this link for the alexa console.
When we logged in we need to go to skills section where we should see something like:
After that just go to Dev Skills:
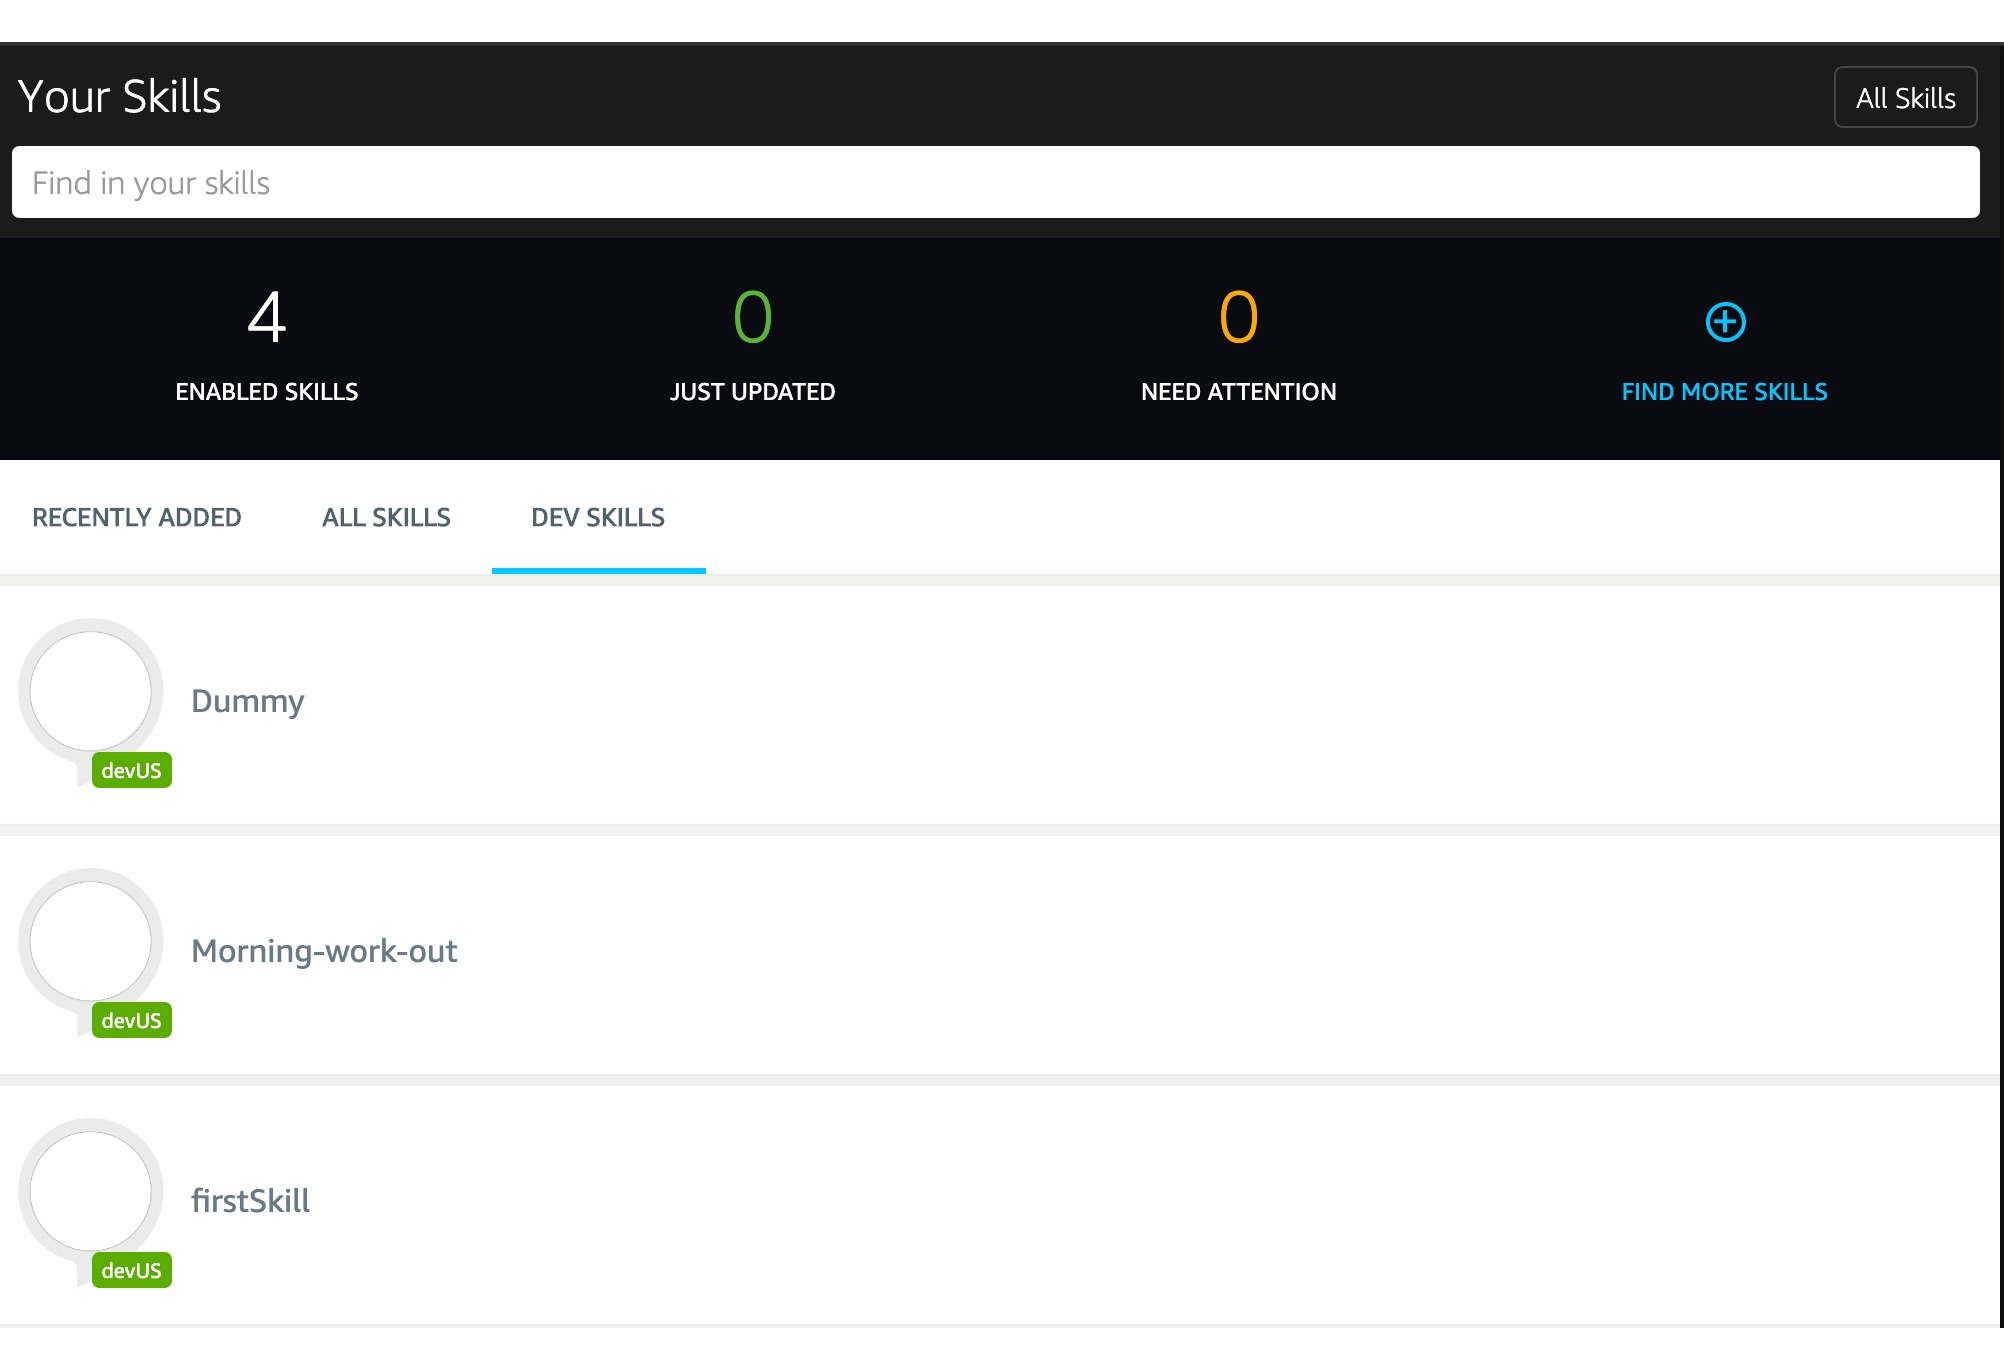
On this page just pick your skill and enable it.
That is it hopefully if we did everything write our skill will work successfully.
As always I hope it was really hopeful and interesting for you! See you around.

You May Also Enjoy